
Welcome, Lets Get Creative!
Learn How to Easily IronOn Your Logo or Design
onto a Stainless Mug or Cup
How To Turn A Business Logo Into IronOn & Vinyl
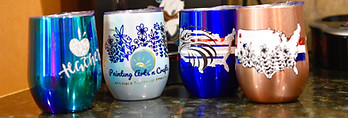

Iron-On is probably one of the greatest craft inventions ever! I love how easy it is to weed and that you can apply it to so many different materials too. And now with embossing machines like the Circuit & Silhouette you cut incredibly intricate designs, you can even cut your business logo for a one of a kind cup. In this project, I'll be sharing four designs and some great tips on how to multilayer on Stainless.
Level: Beginner
Time: Less than 30 minutes from design to finish (you will spend more time making your design & weeding it than you will Iron it on!)
Materials:
-
Stainless cup of your choosing, I get mine on Amazon just because I don't always have time to go to the store.
-
Iron-on of your choosing, I used Iron On Lite, Glitter, and Metallics (yes, you can mix & match them all)
-
Heat resistant gloves pro tip, the stainless gets super hot really fast! (I'll post a link to some great options below)
-
Embossing Machine: I use Cricut but there are many other brands, they all work similarly
-
Art designs: all of these are listed on my Cricut Community profile page, the link is located on the tab titled 'Cricut Projects'!
-
Easy Press or Iron: setting for Easy Press is 300, about 30 seconds
Quick Steps:
-
Create your Artwork (or use mine)
-
Weed your Ironon
-
Apply the bottom layer first (preheat the cup for 5 seconds speeds up the process but is not required)
-
Position the next layer, protect the first layer by reusing the plastic carrier sheet on top of the next layer, apply. Continue this until it's done
Enjoy!
Detailed How-To Steps & Design Tips, Even How to Make Your Logo into an IronOn or Cut Vinyl!
To use this design go to the Paintingartsncrafts Community/Cricut page. Click on this project and select Customize. If you are a member of Cricut Access these images should be free to use. If you are not a member you may be charged, so you might consider joining if you do a lot of crafts. To use your own design you will need to load into Cricut Design Space.
Measure the cup you are working with to see if you need to resize the image, mine was a 12 oz Mascot Stainless Wine cup I purchased on Amazon, so my project size fits that cup face.
(Design tip: pay attention to the curvature of your cup is it flat faced or curved? Mine is slightly curved so I had to take that into account, my image fits one half of one side to reduce wrinkling, and it's a better design, and it will apply easier.)
-
At this point, if you are using the same cup type leave my design on the page for a size reference.
-
Import your Business logo SVG file. An SVG file is required in order to break apart the logo design into components. Click the Upload button the left menu bar, locate your file, and follow the online instructions, saving it as a cut file. Then click the upload image and insert it. This returns you to the design page & puts it on your mat.
-
Highlight your logo and resize it to be close to the size you want or the size I did with mine.
-
Click ungroup (located on either the top right or bottom right of the design software, depending on desktop vs iPad)
-
Open the layers panel (looks like a pile of papers)
-
Click on each logo element, change its color to match your logo by clicking on the circle. Design tips:
-
If your logo has tiny lines, they will be harder to weed, you may want to invert the design so that it cuts out of a 'shape' vs having it be the shape.
-
Think about the color of your cup vs the colors of your logo, is there contrast? If not, to create more you have a few options, using the outline (add link to video) feature on a duplicate image you can create a background piece in a color to ensure your logo is highlighted, or you can do a back & white version of your logo, or a metal & matte version, etc. I have a blog that speaks to designing great crafts & art in more detail.
-
-
Save your project
-
Click “Make It” to precheck that the design parts are showing up on separate mats for cutting. (You may want to ‘test’ cut on a cheap piece of paper before cutting your expensive materials, this will help you test position & size for the cup, and verify how it will cut too. To do this you can click on each item, you will see a ..., click on that, and move them all to one mat, cut it and then go back to the design window to reselect “Make It’ to return the designs to separate color matts.)
-
Now that you are on the ‘make it’ screen here’s a pro tip: click each mat and move your designs to leave 2 inches left and right of them, you will use the extra space as handles for easier application! Yes, you will lose some iron-on material, and while I hate to waste material a cup is a round object, you need to hold onto the design during the ironing process!
-
Cut your final design on your Iron-On making sure to select ‘mirror image’ & that you place the Iron-on shiny side down on your mat, hand cut off the portion of the image since it will not use up all of the page materials. In fact, this is a great project for your scraps, cup images are really small. Be sure to leave some extra on both sides of the image to create the handle for holding it around the cup. Weed (remove the materials off of the plastic carrier sheet that you will not be ironing on). You will notice that the plastic is a bit tacky, that’s to help it stay in place when you are ironing it on.
-
Make sure your cup is clean & dry (rubbing alcohol works great to degrease but is honestly optional). Put your heat resistance gloves on, let’s get started!
-
Settings: Cricut 300, Timer 30 seconds. Refer to your material instructions to see if you should pull the plastic off while it’s hot or wait for it to cool.
-
Method: directly apply the cup to the Easy Press for 5 seconds to warm the cup (Pro Tip: I have trouble holding the Easy Press for long periods, so I just turn it on its side in the base and use my left hand to keep it from tipping over.)
-
Apply your bottom layer iron-on image first, rolling the cup back & forth slowly, (do NOT slide it, that may scratch the cup) this is also why you want extra plastic to use as handles. Since you are applying it directly to the mug, it may be ready faster than 30 seconds, check it. You’ll notice the plastic backing will appear to separate from the ironon. (Pro Tip: You can quickly cool the cup if needed in your refrigerator.)
-
Repeat this process with the next layer, working from the back of the image to the front. (Pro Tip: When you apply the subsequent layers you want to protect the existing layers with the plastic sheet, I just reuse the original (layer image to iron-on, on top of that put back the first plastic, so that all of the images are covered, you don’t want to burn the materials).
-
Enjoy your new Mug/Cup!
For more project ideas check out my Cricut Project page and other Blog articles. To learn more about how to make great designs click here. Join to receive free cutting files & to share your projects!
Supplies for this project can be found here. My affiliate links do not cause you to pay extra, they just give me a small kickback to help pay for my blog.


